
Before and After: Home Staging with Decorative Film (Doors, Trim, Built-Ins, and More)
- Gevitt

- Dec 26, 2025
- 3 min read
Opening: The listing looks “fine”… but the photos feel dated
In MLS images, buyers notice surfaces first—doors, trim, and built-ins—because they create the strongest lines in wide-angle shots. If those surfaces look yellowed, scuffed, or mismatched, the whole home reads “older,” even after great staging. Lamination decorative film (also known as PVC lamination film, architectural film, or interior film) is a fast, low-mess way to refresh those high-visibility areas—without paint dry times or replacement costs.

Quick takeaway (Home Stager edition)
Most photo-safe choice: matte finishes (less glare, hides flaws)
Highest-impact order: doors → trim → built-ins
Avoid: high-gloss on large, sunlit surfaces (window glare + hot spots)
The highest-ROI “Before → After” upgrades for MLS photos
When you’re staging, the goal isn’t “perfect renovation”—it’s photo-ready consistency. Decorative film works best on repeated elements that appear in multiple shots: hallway doors, baseboards, window trim, media walls, and built-ins. With the right lamination decorative film, you can create a cohesive, updated look that reads “intentional” on camera.
Related Articles:

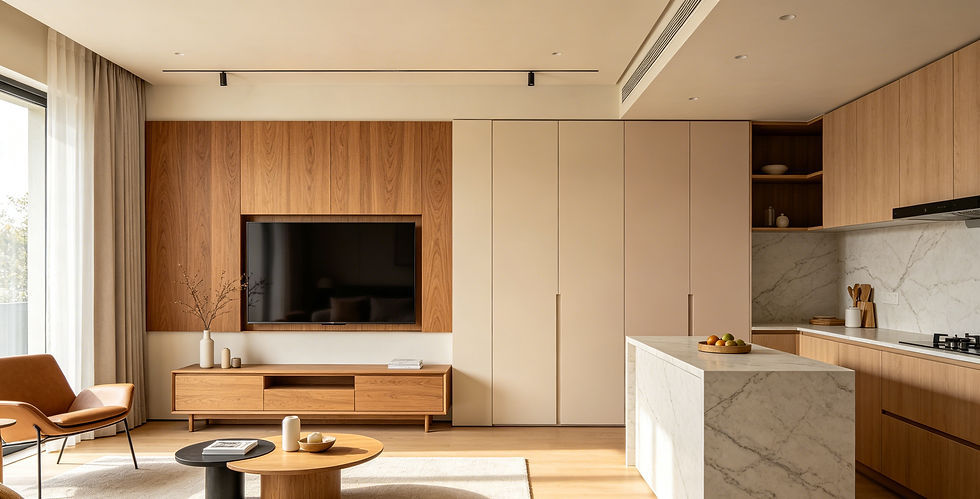
Doors: from builder-basic to modern millwork
Before: orange-toned wood, chips near handles, uneven sheen.After: a matte woodgrain decorative film (light oak or warm greige) makes the entire corridor feel newer—especially when every door matches.
Mini-case: South-facing hallway + strong daylight → matte light oak film on doors = fewer blown highlights, cleaner lines in wide shots.
Trim: from shiny + dented to clean, quiet edges
Before: glossy trim reflects windows/flash; dents and caulk lines pop in photos.After: matte interior film reduces reflections so trim frames the room instead of stealing attention.
Mini-case: Occupied home + lots of touch points → matte warm white film on baseboards = less visible smudging during showings.
Built-ins: from “worn storage” to “designed feature”
Before: mismatched shelves, tired laminate, dated dark stain.After: a soft matte solid or subtle stone look in PVC lamination film turns built-ins into a focal point—making rooms feel curated with minimal decor.
Quick before/after summary table (stager-friendly)
Area | “Before” in MLS photos | “After” with decorative film | Best finish for MLS |
Interior doors | dated tone, scuffs, uneven sheen | uniform modern surface | matte woodgrain |
Trim / baseboards | glare, dents visible | cleaner edges, less reflection | matte solid |
Built-ins / shelves | worn laminate, mismatched color | cohesive “custom” feel | matte solid / soft stone |
Entry feature wall | bland, forgettable | premium focal point | soft matte texture |
Utility closet doors | cheap + scuffed | looks finished, intentional | matte neutral |
Best finishes for staging (quick picks)
Use finishes that photograph like real materials and stay consistent across rooms:
Doors: matte woodgrain (light oak / greige)
Trim: matte solid (warm white / soft white)
Built-ins: matte solid or soft stone (low-reflection)
Tip: If you want a glossy look, treat it like jewelry—small accents only, and only with controlled lighting. Gloss shows seams and prep flaws faster than matte.

FAQ (Home Stagers ask this a lot)
Is matte or gloss better for listing photos?
For most homes, matte looks better in MLS images because it reduces glare and hides surface flaws. Use gloss only for small accents with controlled lighting.
Will decorative film damage doors or trim?
When the right adhesive is matched to the surface and prep is done correctly, film can be a low-mess upgrade option. Always test a small area first—especially in rentals or older paint.
What surfaces should I avoid?
Avoid heavily textured, dusty/chalky, or actively peeling surfaces. Smooth, clean, stable substrates deliver the most “real remodel” look on camera.
Want a “Photo-Ready Sample Kit” for doors, trim, and built-ins?
Tell us (1) the surface (doors/trim/built-ins), (2) lighting (big windows vs low light), and (3) style (light oak, greige woodgrain, warm white, stone). We’ll recommend the best lamination decorative film / PVC lamination film options for MLS photos—plus a quick install checklist to reduce bubbles and visible seams.
Request: Photo-Ready Sample Kit (Top 6 matte-first finishes + optional gloss accents)


Comments