
Is Decorative Film Worth It for Home Staging? Cost, ROI, and When to Use It
- Gevitt

- Dec 28, 2025
- 3 min read
That’s why many stagers use lamination decorative film (also called PVC lamination film, architectural film, or interior film) to create a cleaner, newer look in 24–48 hours—with less dust, less disruption, and fewer “jobsite side effects” than traditional remodeling.

The staging pain point: “I need a renovated look—without renovation time or budget.”
Home staging is judged in photos, not construction plans. But the surfaces buyers notice most—cabinets, doors, trim, and built-ins—are often the most expensive to replace and the slowest to repaint.
For science-based guidance on minimizing indoor air impacts during home improvement work, see U.S. EPA: Best Practices for Indoor Air Quality When Remodeling Your Home.
What “worth it” means for stagers (ROI = speed + photo impact + risk control)
For Home Stagers, ROI isn’t only the material price. It’s the combination of time saved, photo upgrade, and rework avoided. Decorative film is usually worth it when it helps you do at least one of these:
Upgrade a surface that appears in 3+ MLS photos (kitchen, entry, living built-ins, primary bath)
Avoid paint delays (dry time, odor, cure time, touch-ups)
Reduce replacement pressure (especially cabinet doors, trim, and interior doors)
ROI quick math
If a surface is visually “dating” the listing, compare these two totals:
Film route: material + ~1–2 hours install + minimal cleanup
Paint/replace route: prep + dry/cure time + touch-ups + disruption (often multiple visits)
If the film route prevents even one extra day of disruption or one round of touch-ups on a high-visibility area, it’s usually a net win—especially for fast-turn staging schedules.
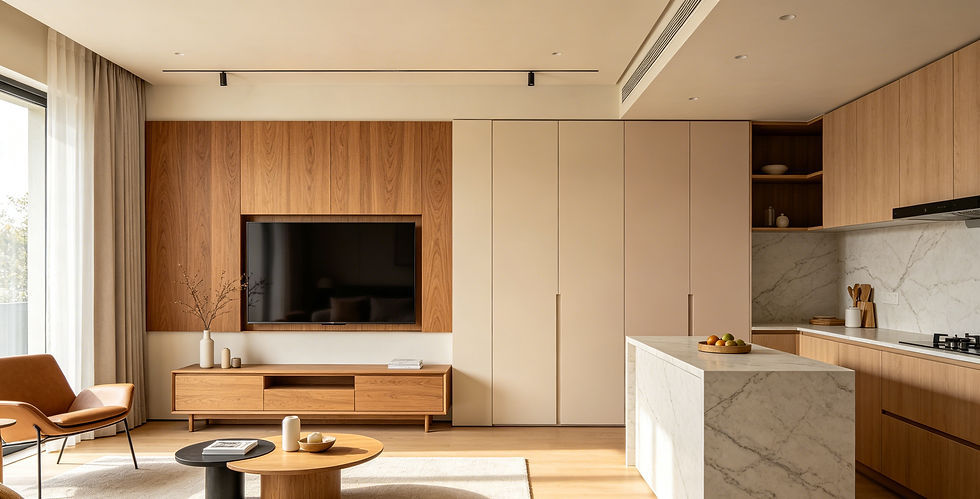
Where decorative film delivers the biggest “before → after” impact
The best returns come from changing what the camera can’t ignore: long lines, flat planes, and repeated elements. Target the areas that visually “date” a home and repeat across multiple shots.
Top 5 surfaces to wrap first
Cabinet fronts (biggest photo footprint) — use cabinet wrap film / cabinet vinyl wrap
Interior doors (repeated across hallways and bedrooms)
Trim & baseboards (frames every room; glare makes flaws obvious)
Built-ins & media walls (turn “worn storage” into a feature moment)
Vanity fronts (bath photos are picky; refresh reads expensive)
Example: A dated kitchen can look “updated” by wrapping cabinet doors in a matte woodgrain decorative lamination film (light oak or warm greige). In MLS images, matte finishes reduce glare and hide micro-scuffs—so the space reads cleaner and newer without a full remodel.

Cost vs payoff: when film beats paint or replacement (quick summary)
Use PVC decorative film strategically—don’t wrap everything. Film is strongest on stable, clean, smooth substrates, and matte finishes are usually the most photo-safe.
Staging Scenario | Best Option | Why It’s Worth It | Recommended Finish |
Dated cabinets, rental-grade look | Cabinet wrap film | Biggest photo impact, fast refresh | Matte woodgrain / matte solid |
Scuffed interior doors & trim | Architectural film / interior film | Cleaner lines in wide shots, less glare | Matte solid |
Built-ins look worn or mismatched | Decorative lamination film | Turns “storage” into a design feature | Soft matte solid / stone look |
Timeline is tight (24–48 hrs) | Film over paint | Less downtime, fewer touch-ups | Matte |
Deep swelling / peeling / water damage | Repair or replace | Film won’t fix structure | — |
When NOT to use decorative film
Decorative film isn’t magic—it’s a surface upgrade. Skip it when:
The surface is actively peeling, chalky, or swollen (common with water-damaged MDF)
The substrate is heavily textured (film won’t lay flat; seams/edges show)
You’re trying to hide major structural defects (repair first)
What to do instead: Spot-repair, stabilize, and smooth the area first (or replace that panel). Film performs best on a clean, stable base—then it looks like a real finish, not a cover-up.
Want a “photo-ready ROI plan” for your next staging job?
Tell us your project details—surface (cabinets/doors/built-ins), lighting (big windows vs low light), and style goal (woodgrain/marble/solid)—and we’ll recommend the best lamination decorative film / PVC lamination film options for staging, plus a short install checklist to reduce bubbles and visible seams.
Request a Photo-Ready Sample Kit (matte-first + stager favorites)Keywords you’ll see in specs: lamination decorative film, PVC lamination film, decorative lamination film, cabinet wrap film, cabinet vinyl wrap, architectural film, interior film
FAQ
Will decorative film damage paint or doors?
If the surface is stable and properly prepped, film can be a low-mess upgrade. For rentals or older paint, test a small area first and confirm the right adhesive/removal approach for that substrate.
How long does it last through showings?
For staging timelines, the main goal is a clean, consistent look during photos and tours. A quality decorative film finish holds up well for typical showing traffic—especially matte options that hide smudges and micro-scratches.
Should I choose matte or gloss for MLS photos?
For most homes, matte photographs better because it reduces glare and hides surface flaws. Use gloss only for small accents with controlled lighting (and perfect edge finishing).


Comments